cscore
cscore is a minimal-footprint library providing commonly used helpers & patterns for your C# projects. It can be used in both pure C# and Unity projects.
This project is maintained by cs-util-com
The cscore Library
![]()


Website • GitHub • Examples • Getting started • Demo (in your browser)
cscore is a lightweight library providing commonly used helpers & patterns for both your pure C# and Unity projects.
Fewer 3rd party libraries and dependencies included in a project means fewer code and complexity which in the end leads to less bugs. On the other hand having zero dependencies very likely means that a few fundamental concepts and patterns you will have to implement over and over for each new project. This repo tries to provide a single source for a few simple to extend features to make sure these work great together and build up on each other. Some things like logging, communication of components, dependency and state management, easy to use IO and similar fundamental challenges in software are things all applications benefit from.
This is why I think it makes sense to put this into a single compact core library with great test coverage and
great documentation. And these two can go hand in hand, well written tests can serve as a easy to
understand documentation + usage examples, which automatically stay up to date since they have to
change with the code over time. That’s how the unit tests in this project ensure all features are
well tested and documented. See below for some extracts from these tests. To ensure full test
coverage mutation testing is used (thanks to Stryker!)
All components are loosly coupled so that components can be used individually when needed without deep knowledge about the full cscore library required.
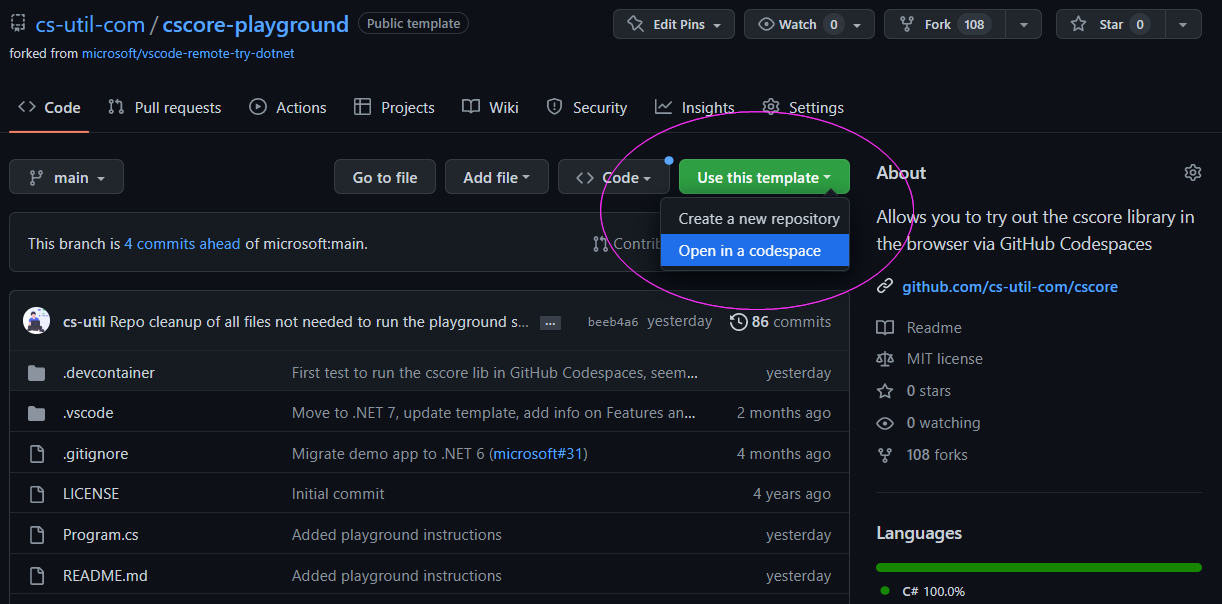
Test cscore in the browser
Go to the cscore-playground to test the library in your browser (via GitHub codespaces):
Overview
The following summary gives a quick overview of all library features:
Pure C# Components
The aim of the cscore package as to stay is slim/minimal as possible while including the feature and functionality typical projects would benefit from.
- Log - A minimalistic logging wrapper + AssertV3 to add saveguards anywhere in your logic
- EventBus - Publish and subscribe to global events from anywhere in your code. Handles 1 million events a second with minimal memory footprint!
- Injection Logic - A simple inversion of control pattern that does not rely on magic. Relies on the EventBus system, so it has the same speed as well!
- JSON Parsing - Reading and writing JSON through a simple interface. Default implementation uses Json.NET to ensure high performance
- REST Extensions - Extensions to simplify sending REST requests in as few lines as possible without limiting flexibility
- Directory & File Extensions - To simplify handling files, folders and persisting data
- Common String extension methods demonstrated in StringExtensionTests.cs
- Functional extensions and Transducers to allow functional data mapping (filter, map, reduce, ..)
- Simple statemachines that work on your existing classes
- An asynchronous chainable key value store (get & set) that can be used for anything from simple persistent settings to remote server/DB access
- An immutable datastore (Redux syntax) that includes undo/redo, timetravel (replay recordings) and a thunk middleware (dispatching async tasks)
- A JsonMerger helper to allow simple Json merging and diffing logic that helps to update an instance of a class using a Three-way merge
- An AutoMapper to map fields and attributes from one class to another using simple json serialization under the hood.
- Many other helpful extension methods best demonstrated in HelperMethodTests.cs
Additional Unity Components
- GameObject.Subscribe & MonoBehaviour.Subscribe - Listening to events while respecting the lifecycle of Unity objects
- MonoBehaviour Injection & Singletons - Using the injection logic to create and access Unity objects
- The Link Pattern - Making it easy to connect prefabs with code (and by that separate design & UI from your logic)
- The ViewStack Pattern - Using GameObjects as separate views stacked in a parent object and controlled by a single ViewStack to introduce a simple solution for switching views and UI screens.
- MonoBehaviour.ExecuteDelayed & MonoBehaviour.ExecuteRepeated - Executing asynchronous actions delayed and/or repeated
- UnityWebRequest.SendV2 - UnityWebRequest extension methods
- PlayerPrefsV2 - Adds
SetBool,SetStringEncryptedand more, see PlayerPrefsV2Tests.cs for all examples - Running xUnit tests in Unity - Execute your xUnit tests in Unity even in the built application to ensure everything works as expected in the production runtime
💡 Usage & Examples
See below for a full usage overview to explain the APIs with simple examples.
Logging
A lightweight zero config Log wrapper that is automatically stripped from production builds and can be combined with other logging libraries like Serilog for more complex use cases.
Log.d("I'm a log message");
Log.w("I'm a warning");
Log.e("I'm an error");
Log.e(new Exception("I'm an exception"));
Log.w("I'm a warning with params:", "param 1", 2, "..");


// Performance (timings & memory) logging example:
void MyMethod1() {
    using (Log.MethodEntered()) {
        // Some method body (duration and memory will be logged)
    }
}

// Or written with a different using syntax:
void MyMethod1(int myVar123) {
    using Stopwatch timing = Log.MethodEnteredWith(myVar123);
    // Some method body (duration and memory will be logged)
}
This will result in the following output in the Log:
> I'm a log message
  * at LogTests.TestBasicLogOutputExamples() c:\..\LogTests.cs:line 19
  ..

> WARNING: I'm a warning
  * at LogTests.TestBasicLogOutputExamples() c:\..\LogTests.cs:line 20
     ..

>>> EXCEPTION: com.csutil.Error: I'm an error
 : [[com.csutil.Error: I'm an error]]
    * at LogTests.TestBasicLogOutputExamples() c:\..\LogTests.cs:line 21
     ..

>>> EXCEPTION: System.Exception: I'm an exception
 : [[System.Exception: I'm an exception]]
    * at LogTests.TestBasicLogOutputExamples() c:\..\LogTests.cs:line 22
     ..

> WARNING: I'm a warning with params: : [[param 1, 2, ..]]
     ..

--> MyMethod1
     ..
<-- MyMethod1 finished after 3 ms, allocated managed mem: 525,40 KB, allocated mem: 12,00 KB
Creating logging-adapters is simple, the following logging-adapters can be used out of the box (and they can be seen as examples/templates):
-
LogToConsole.cs - The default logger which uses the normal
System.Console -
LogToUnityDebugLog.cs - The default logger when using the library in Unity projects, when using it
UnityEngine.Debug.Logis used for all logging events -
LogToFile.cs - Allows to write all log outputs into a persisted file
-
LogToMultipleLoggers.cs - Allows to use multiple loggers in parallel, e.g. to log to the console, a file and a custom error reporting system simultaneously
The used logging-adapter can be set via Log.instance = new MyCustomLogImpl();
Through this abstraction it becomes easy to later switch to more complex logging backends, e.g. the Serilog logging library, while keeping your code unchanged.
AssertV3
AssertV3can be used anywhere in your code- Will be automatically removed/stripped from your production code
- Can be configured to
Log.ean error (the default) or to throw an exception - Use
AssertV3in places where you would otherwise add a temporaryLogline while testing.AssertV3can stay in your code and will let you know of any unexpected behaviour - Will automatically pause the Debugger if it fails while debugging
- The error message string will only be evaluated if the assertion fails, to prevent unnecessary memory allocations or performance issues when logging is active.
AssertV3.IsTrue(1 + 1 == 3, () => "This assertion will fail");
See here for more examples.
Log.MethodEntered & Log.MethodDone
- Simple monitoring of method calls and method-timings to detect abnormal behavior
- Easy to follow logging pattern for each method or method section where logging is helpful
- Optional
maxAllowedTimeInMsassertion at the end of the method - The returned
Stopwatchcan be used for additional logging if needed
private void SomeExampleMethod1(string s, int i) {
    Stopwatch timing = Log.MethodEnteredWith("s=" + s, "i=" + i);

    { // .. here would be some method logic ..
        Thread.Sleep(3);
    } // .. as the last line in the tracked method add:

    Log.MethodDone(timing, maxAllowedTimeInMs: 50);
    // If the method needed more then 50ms an error is logged
}
This will result in the following output in the Log:
>  --> LogTests.SomeExampleMethod1(..) : [[s=I am a string, i=123]]
  at LogTests.SomeExampleMethod1(System.String s, Int32 i)

>     <-- LogTests.SomeExampleMethod1(..) finished after 3 ms
  at LogTests.SomeExampleMethod1(System.String s, Int32 i)
MethodAnalytics
Analyzing the results of these Log.MethodEntered.. and Log.MethodDone.. is possible for example through the
MethodAnalytics class:
var methodAnalytics = new MethodAnalytics() { includeMethodArguments = true };
StopwatchV2 t = Log.MethodEntered();
MyMethod1(true);
Log.MethodDone(t);
string report = methodAnalytics.ToString();
The report string from this is:
{
  "MethodName": "ExampleUsage1",
  "DurationInMs": 135,
  "Then": [
    {
      "MethodName": "MyMethod1",
      "DurationInMs": 120,
      "Args": [ "True" ],
      "Then": [
        {
          "MethodName": "MyMethod2",
          "DurationInMs": 28,
          "Args": [ "10" ],
          "Then": [ .. ]
        },
        {
          "MethodName": "MyMethod3",
          "Args": [ "abc" ]
        },
        {
          "MethodName": "MyMethod1",
          "DurationInMs": 52,
          "Args": [ "False" ],
          "Then": [
            {
              "MethodName": "MyMethod2",
              "DurationInMs": 26,
              "Args": [ "10" ],
              "Then": [ .. ]
            },
            ..
          ]
        }
      ]
    }
  ]
}
See the MethodAnalyticsTests here for more examples.
The created analytics tree tries to represent the relation between the different logging events but in multi-threading setups or
if Log.MethodDone.. is not always called the created relations in the tree can’t always represent the actual “Who was called by
whom” relationships. Because of that creating short-lived MethodAnalytics instances to analyse specific parts of your code is recommended.
The EventBus
- Publish and subscribe to global events from anywhere in your code
- Sends 1 million events in under 3 seconds with minimal memory footprint! (Tested on a mid-range laptop - will add some more detailed numbers soon)
// The EventBus can be accessed via EventBus.instance
EventBus eventBus = EventBus.instance;
string eventName = "TestEvent1";

//Register a subscriber for the eventName that gets notified when ever an event is send:
object subscriber1 = new object(); // can be of any type
eventBus.Subscribe(subscriber1, eventName, () => {
    Log.d("The event was received!");
});

// Now send out an event:
eventBus.Publish(eventName);

// When subscribers dont want to receive events anymore they can unsubscribe:
eventBus.Unsubscribe(subscriber1, eventName);
Rule of thumb: Only use an EventBus if you can’t exactly tell who will listen to the published events.
Do not use the EventBus to pass an event from x to y if you know exactly who x and y will be!
Artificially separating 2 components that tightly belong together does not help
Injection Logic
- A simple inversion of control pattern with the main call being
MyClass1 x = IoC.inject.Get<MyClass1>(this);wherethisis the requesting entity - Relies on the EventBus system, so its fast with minimal memory footprint as well (got about a million injections in ~3 sec).
- Free of any unpredicable magic via anotations - I tried to keep the injection API as simple as possible, existing libraries often tend to overcomplicate things
- Lazy loading, singletons and transient types (every inject request creates a new instance) are all easily implementable via
.RegisterInjector, see examples below:
// The default injector can be accessed via IoC.inject
Injector injector = IoC.inject;

// Requesting an instance of MyClass1 will fail because no injector registered yet to handle requests for the MyClass1 type:
Assert.Null(injector.Get<MyClass1>(this));

// Setup an injector that will always return the same instance for MyClass1 when IoC.inject.Get<MyClass1>() is called:
MySubClass1 myClass1Singleton = new MySubClass1();
injector.SetSingleton<MyClass1, MySubClass1>(myClass1Singleton);

// Internally .SetSingleton() will register an injector for the class like this:
injector.RegisterInjector<MyClass1>(new object(), (caller, createIfNull) => {
    // Whenever injector.Get is called the injector always returns the same instance:
    return myClass1Singleton; // Here the singleton could be lazy loaded
});

// Now calling IoC.inject.Get<MyClass1>() will always result in the same instance:
MyClass1 myClass1 = injector.Get<MyClass1>(this);
Assert.Same(myClass1Singleton, myClass1); // Its the same object reference
Another extended example usage can be found in
InjectionTests.ExampleUsage2() (see here)
IEnumerable Extensions
For common tasks on IEnumerables cscore provides methods like Map (same as LINQs Select),
Reduce (same as LINQs Aggregate) and Filter (same as LINQs Where) but also
IsNullOrEmpty and ToStringV2 which are explained in this simple example:
IEnumerable<string> myStrings = new List<string>() { "1", "2", "3", "4", "5" };
IEnumerable<int> convertedToInts = myStrings.Map(s => int.Parse(s));
IEnumerable<int> filteredInts = convertedToInts.Filter(i => i <= 3); // Keep 1,2,3
Assert.False(filteredInts.IsNullOrEmpty());
Log.d("Filtered ints: " + filteredInts.ToStringV2(i => "" + i)); // "[1, 2, 3]"
int sumOfAllInts = filteredInts.Reduce((sum, i) => sum + i); // Sum up all ints
Assert.Equal(6, sumOfAllInts); // 1+2+3 is 6
More usage examples can be found in the HelperMethodTests.cs
Type IsSubclassOf & IsCastableTo
Extension methods to check if a type is a subclass of another type:
Type MySubClass1 = typeof(MySubClass1);
Assert.True(MySubClass1.IsSubclassOf<MyClass1>());
Assert.True(typeof(MySubClass1).IsCastableTo<MyClass1>());
JSON Parsing
- The
JsonWriterandJsonReaderinterfaces are an abstraction that should be flexiable enough to be used for most usecases. - The underlying implementation can easily be swapped if needed and the default implementation uses Json.NET.
class MyClass1 { // example class with a field and a property
    public string myString;
    public string myString2 { get; set; }
}

MyClass1 x1 = new MyClass1() { myString = "abc", myString2 = "def" };

// Generate a json object from the object that includes all public fields and props:
string jsonString = JsonWriter.GetWriter().Write(x1);

// Parse the json string back into a second instance x2 and compare both:
MyClass1 x2 = JsonReader.GetReader().Read<MyClass1>(jsonString);
Assert.Equal(x1.myString, x2.myString);
Assert.Equal(x1.myString2, x2.myString2);
Directory & File Extensions
The DirectoryInfo and FileInfo classes already provide helpful interfaces to files and directories and the following extensions improve the usability if these classes:
// Get a directory to work in:
DirectoryInfo myDirectory = EnvironmentV2.instance.GetAppDataFolder();
Log.d("The directory path is: " + myDirectory.FullPath());

// Get a non-existing child directory
var childDir = myDirectory.GetChildDir("MyExampleSubDirectory1");

// Create the sub directory:
childDir.CreateV2(); // myDirectory.CreateSubdirectory("..") works too

// Rename the directory:
childDir.Rename("MyExampleSubDirectory2");

// Get a file in the child directory:
FileInfo file1 = childDir.GetChild("MyFile1.txt");

// Saving and loading from files:
string someTextToStoreInTheFile = "Some text to store in the file";
file1.SaveAsText(someTextToStoreInTheFile);
string loadedText = file1.LoadAs<string>(); // loading JSON would work as well
Assert.Equal(someTextToStoreInTheFile, loadedText);

// Deleting directories:
Assert.True(childDir.DeleteV2()); // (Deleting non-existing directories would returns false)
// Check that the directory no longer exists:
Assert.False(childDir.IsNotNullAndExists());
StateMachines
A statemachine in it’s simplest form is a current state and a set of allowed state transitions. Transitioning from state 1 to 2 can be done in a single short method on the set of allowed transitions. Here an example statemachine:
 // First define a set of allowed transitions to define the state machine:
Dictionary<MyStates, HashSet<MyStates>> stateMachine = new Dictionary<MyStates, HashSet<MyStates>>();
stateMachine.AddToValues(MyStates.MyState1, MyStates.MyState2); // 1 => 2 allowed
stateMachine.AddToValues(MyStates.MyState2, MyStates.MyState3); // 2 => 3 allowed

// Initialize a state-machine:
MyStates currentState = MyStates.MyState1;

// It is possible to listen to state machine transitions:
StateMachine.SubscribeToAllTransitions<MyStates>(new object(), (machine, oldState, newState) => {
    Log.d("Transitioned from " + oldState + " to " + newState);
});
// And its possible to listen only to specific transitions:
StateMachine.SubscribeToTransition(new object(), MyStates.MyState1, MyStates.MyState2, delegate {
    Log.d("Transitioned from 1 => 2");
});

// Transition the state-machine from state 1 to 2:
currentState = stateMachine.TransitionTo(currentState, MyStates.MyState2);
Assert.Equal(MyStates.MyState2, currentState);

// Invalid transitions throw exceptions (current state is 2):
Assert.Throws<InvalidOperationException>(() => {
    currentState = stateMachine.TransitionTo(currentState, MyStates.MyState1);
});
More statemachine examples can be found here.
KeyValueStore
Provides an async chainable key value store (get & set) that can be used for simple persistent settings but also for remote server/DB access. Different store implementations are included for some common use cases:
- InMemoryKeyValueStore - Keeps a very fast in memory dictionary for fastest possible read write
- FileBasedKeyValueStore - Enables persisting values permanently
- RetryKeyValueStore - A retry layer using exponential backoff
- ExceptionWrapperKeyValueStore - To handle exceptions of an inner store (e.g. if a connection to a remote server throws a timeout exception this can be handled to return the cached local value instead)
IKeyValueStore store = new InMemoryKeyValueStore();
string myKey1 = "myKey1";

MyClass1 x1 = new MyClass1() { myString1 = "Abc", myString2 = "Abc2" };
store.Set(myKey1, x1);

MyClass1 x2 = store.Get<MyClass1>(myKey1, defaultValue: null).Result;
Assert.Equal(x1.myString1, x2.myString1);
Assert.Equal(x1.myString2, x2.myString2);
The KeyValueStores can be chained so that if the outer store does not find the element it will ask the next inner store.
This allows to have fast stores like the InMemoryKeyValueStore on the most outer level and the slowest stores like the
connection to the database on the most inner one:
string myKey1 = "test123";
MyClass1 x1 = new MyClass1() { myString1 = "Abc", myString2 = "Abc2" };

// Create a fast memory store and combine it with a LiteDB store that is persisted to disk:
IKeyValueStore store = new InMemoryKeyValueStore().WithFallbackStore(new FileBasedKeyValueStore(EnvironmentV2.instance.GetOrAddTempFolder("SomeFolder123")));
await store.Set(myKey1, x1);

MyClass1 x2 = await store.Get<MyClass1>(myKey1, null);
Assert.Equal(x1.myString1, x2.myString1);
Assert.Equal(x1.myString2, x2.myString2);
More examples can be found here.
Immutable DataStore
- It uses the Redux syntax and core principles to not reinvent the wheel on a matured and well proven concept
- Enables undo/redo of all dispatched actions out of the box without any additional work
- Enables time travel to enable recording the full user interaction and replaying it later to get back into the same state
- Includes a thunk middleware to dispatch async tasks (e.g. talking to a remote server)
See this example for a first introduction including an example datamodel, example actions and some listeners that are informed when the datamodel changes.
See here for additional more complex examples which include the other features like undo/redo, middlewares and server synchronization.
And if your model is not immutable from top to bottom, so if it was not designed from the beginning to be impossible to change without a data store then the example how to use Redux with mutable state will be relevant for you. Here an extract:
// A middleware that will allow to use mutable data in the data store:
var model = new MyAppState1() { user = new MyUser1() { name = "Carl" } };
var mutableMiddleware = Middlewares.NewMutableDataSupport<MyAppState1>();
var loggingMiddleware = Middlewares.NewLoggingMiddleware<MyAppState1>();
var store = new DataStore<MyAppState1>(MyReducer1, model, mutableMiddleware);
store.AddStateChangeListener(s => s.user, (MyUser1 theChangedUser) => { ... });
..
store.Dispatch(new ActionChangeUserName() { targetUserId = "1", newName = "Caaarl" });
Changes performed through the DataStore will allow the same state change listening as for immutable data models but
the big advantage to be sure that only the store can change the model is of course not given since
anyone could just do model.name = "Ohnoo" anywhere in the code. Working with internal or private setters for
all fields can get you closer to immutable safety but data structures like List you will not be able to protect the way an
ImmutableList does.
JsonMerger
Json merging and diffing logic that helps to update an instance of a class using a Three-way merge. Here an example:
MyClass1 originalObj = new MyClass1() { myString = "abc", myString2 = "def" };

MyClass1 copy1 = originalObj.DeepCopyViaJson();
copy1.myString = "abcd";
copy1.complexField = new MyClass1() { myString = "123", myString2 = "456" };
copy1.complexField.complexList = new List<MyClass1>() { new MyClass1() { myString = "listEntry1" } };

MyClass1 copy2 = originalObj.DeepCopyViaJson();
copy2.myString2 = "defg";

var merge = MergeJson.Merge(originalObj, copy1, copy2);
Assert.False(merge.hasMergeConflict);

// Parse the merged result back into a MyClass1 object:
MyClass1 mergeResult1 = merge.GetResult();

// The changes from both copies were merged correctly:
Assert.Equal(copy1.myString, mergeResult1.myString);
Assert.Equal(copy2.myString2, mergeResult1.myString2);
REST Extensions
// The property names are based on the https://httpbin.org/get json response:
class HttpBinGetResp {
    public string origin { get; set; }
    public Dictionary<string, object> headers { get; set; }
}

RestRequest request = new Uri("https://httpbin.org/get").SendGET();

// Send the request and parse the response into the HttpBinGetResp class:
HttpBinGetResp response = await request.GetResult<HttpBinGetResp>();
Log.d("Your external IP is " + response.origin);
A more complex REST example can be found in the WeatherReportExamples test class. It uses your IP to detect
the city name you are located in and then sends a weather report request to MetaWeather.com:
var ipLookupResult = await IpApiCom.GetResponse();
string yourCity = ipLookupResult.city;
var cityLookupResult = await MetaWeatherLocationLookup.GetLocation(yourCity);
int whereOnEarthIDOfYourCity = cityLookupResult.First().woeid;
var weatherReports = await MetaWeatherReport.GetReport(whereOnEarthIDOfYourCity);
var currentWeather = weatherReports.consolidated_weather.Map(r => r.weather_state_name);
Log.d("The weather today in " + yourCity + " is: " + currentWeather.ToStringV2());
IFileRef for file downloads
Handling file downloads is a common task that includes the download process itself but also generic topics like
communicating progress during the download and checking if the file is already downloaded (and has the
exact same content as the remote file). The IFileRef interface helps with these tasks and
provides common helper methods to download and cache files correctly based on their url:
var dir = EnvironmentV2.instance.GetOrAddTempFolder("SomeFolder1");
IFileRef f = new FileRef() { url = "https://.../someFile123.zip" };
await f.DownloadTo(dir, (float progress) => {
    Log.d($"Download {progress}% done");
}, useAutoCachedFileRef: true);
var downloadText = f.GetFileEntry(dir.FileSystem).LoadAs<string>();
For more examples see the ModelPersistenceTests here.
Action.AsThrottledDebounce
Debouncing will combine a series of sequential calls to a function into a single call to that function. It ensures that one notification is made for an event that fires multiple times.
This is useful if you want to run an action once after a frequent event was triggered once or multiple times, this way events can be “collected” and then processed once. Real world examples where this helps are:
- Every time the user moves the mouse an action is triggered, the logic should react when the user stopped moving the mouse for 50ms.
- A local state of the app is changes 1000 times in 1 second and persisting these local changes to the backend should only be executed once after modifying the local state stopped for minimum 1 second.
Here a code example how Action.AsThrottledDebounce can be used to realize debouncing:
int counter = 0;
bool allWereGood = true;
Action<string> action = (myStringParam) => {
    // Make sure the action is never called with "bad" being passed:
    if (myStringParam != "good") { allWereGood = false; }
    Interlocked.Increment(ref counter);
};
// Make the action throttled / debounced:
action = action.AsThrottledDebounce(delayInMs: 50);

// Call it multiple times with less then 50ms between the calls:
action("good"); // The first call will always be passed through
action("bad"); // This one will be delayed and not called because of the next:
action("good"); // This will be delayed for 50ms and then triggered because no additional call follows after it

Assert.Equal(2, counter);
Assert.True(allWereGood);
Debouncing becomes more relevant the more decoupled your different components are, if a lot of events are send around in the system processing these events often can use debouncing to reduce processing load.
TaskV2 Helpers
Executing the same task multiple times can be helpful for network or file operations, using exponential backoff delays is a common best practice and using TaskV2.TryWithExponentialBackoff its easy to use this approach without writing any manual delay code:
Stopwatch timer = Stopwatch.StartNew();
long finalTimingResult = await TaskV2.TryWithExponentialBackoff<long>(async () => {

    .. Here your async task that might fail and will be auto retried ..

    // In the first second of the test throw errors:
    // Will cause the task to be re-executed with exponential backoff delay
    if (timer.ElapsedMilliseconds < 1000) { throw new Exception(); }
    return timer.ElapsedMilliseconds;
});
Another useful Task related helper is the QueuedTaskScheduler to run multi threaded tasks in parallel but
with full control of how many tasks run concurrently. See TestRunWithTaskScheduler1 for details, here a short extract:
QueuedTaskScheduler scheduler = new QueuedTaskScheduler(TaskScheduler.Default, maxConcurrencyLevel: 1);

// Create both tasks at the same time:
Task t1 = TaskV2.Run(SomeAsyncTask1, new CancellationTokenSource(), scheduler);
Task<string> t2 = TaskV2.Run(SomeAsyncTask2, new CancellationTokenSource(), scheduler);

Assert.Equal(1, scheduler.GetRemainingScheduledTaskCount()); // 1 task started and 1 waiting

await t2;
// t1 never awaited but must be complete because maxConcurrencyLevel=1
Assert.Equal(0, scheduler.GetRemainingScheduledTaskCount());
Transducers
Transducers allow to do similar things as the functional concepts like Filter, Map and Reduce.
The main idea of transducers is to make this functional style as efficient as possible,
iterating through the target structure only once and bulding a pipeline still of the
same easy to understand functional building blocks.
A first example that uses only Filter will give a better idea how this looks like:
List<int> testData = new List<int>() { 1, 2, 3, 4, 5, 6, 7, 8 };

var filter1 = Transducers.NewFilter<int>(x => x > 4);
var filter2 = Transducers.NewFilter<int>(x => x % 2 != 0);
{
    List<int> result = testData.FilterToList(Transducers.Compose(filter1, filter2));
    Assert.Equal(2, result.Count()); // 5 and 7 will be left
    Assert.Equal(5, result.First());
    Assert.Equal(7, result.Last());
}
{ // without Transducers.Compose the filters have to be chained manually:
    List<int> result = testData.FilterToList(x => (filter1(filter2(x))));
    Assert.Equal(2, result.Count()); // 5 and 7 will be left
    Assert.Equal(5, result.First());
    Assert.Equal(7, result.Last());
}
A more complex example that uses Filter, Map and Reduce:
List<MyClass1> testData = newExampleList();

Transducer<MyClass1, MyClass1> filter1 = Transducers.NewFilter<MyClass1>(x => x != null);
Transducer<MyClass1, MyClass1> filter2 = Transducers.NewFilter<MyClass1>(x => x.someInt > 1);
Transducer<MyClass1, int> mapper = Transducers.NewMapper<MyClass1, int>(x => x.someInt);
Func<int, int, int> sumReducer = (total, x) => total + x;

// Create the reducer by composing the transducers:
var sum = testData.ReduceTo(x => filter1(filter2(mapper(x))), sumReducer, seed: 0);
Assert.Equal(6, sum);
More examples can be found in the TransducerTests.cs. The syntax is still work in progress and I am happy for any suggestions how to improve this. And there are some great related sources you can read to learn more about Transducers.
Unity Component Examples
There are additional components specifically created for Unity, that will be explained below:
GameObject and MonoBehaviour Extensions
Some helper methods are added when the com.csutil namespace is imported to help with scene graph manipulation via code.
The added extension methods are GetParent, AddChild, GetOrAddChild, GetOrAddComponent, Destroy and IsDestroyed.
Here are some examples:
GameObject myGo = new GameObject();

// Adding children GameObjects via AddChild:
GameObject myChildGo = myGo.AddChild(new GameObject());

// Getting the parent of the child via GetParent:
Assert.AreSame(myGo, myChildGo.GetParent());

// Lazy-initialization of the GameObject in case it does not yet exist:
GameObject child1 = myGo.GetOrAddChild("Child 1");

// Lazy-initialization of the Mono in case it does not yet exist:
MyExampleMono1 myMono1 = child1.GetOrAddComponent<MyExampleMono1>();

// Calling the 2 methods again results always in the same mono:
var myMono1_ref2 = myGo.GetOrAddChild("Child 1").GetOrAddComponent<MyExampleMono1>();
Assert.AreSame(myMono1, myMono1_ref2);

myGo.Destroy(); // Destroy the gameobject
Assert.IsTrue(myGo.IsDestroyed()); // Check if it was destroyed
GameObject.Subscribe & MonoBehaviour.Subscribe
There are extension methods for both GameObjects and Behaviours which internally handle the lifecycle of their subscribers correctly.
If a GameObject for example is currently not active or was destroyed the published events will not reach it.
// GameObjects can subscribe to events:
var myGameObject = new GameObject("MyGameObject 1");
myGameObject.Subscribe("MyEvent1", () => {
    Log.d("I received the event because I'm active");
});

// Behaviours can subscribe to events too:
var myExampleMono = myGameObject.GetOrAddComponent<MyExampleMono1>();
myExampleMono.Subscribe("MyEvent1", () => {
    Log.d("I received the event because I'm enabled and active");
});

// The broadcast will reach both the GameObject and the MonoBehaviour:
EventBus.instance.Publish("MyEvent1");
MonoBehaviour Injection & Singletons
Often specific MonoBehaviours should only exist once in the complete scene,
for this scenario IoC.inject.GetOrAddComponentSingleton() and IoC.inject.GetComponentSingleton() can be used.
// Initially there is no MonoBehaviour registered in the system:
Assert.IsNull(IoC.inject.Get<MyExampleMono1>(this));

// Calling GetOrAddComponentSingleton will create a singleton:
MyExampleMono1 x1 = IoC.inject.GetOrAddComponentSingleton<MyExampleMono1>(this);

// Calling GetOrAddComponentSingleton again now returns the singleton:
MyExampleMono1 x2 = IoC.inject.GetOrAddComponentSingleton<MyExampleMono1>(this);
Assert.AreSame(x1, x2); // Both references point to the same object

// Calling the default IoC.inject.Get will also return the same singleton:
MyExampleMono1 x3 = IoC.inject.Get<MyExampleMono1>(this);
Assert.AreSame(x1, x3); // Both references point to the same object
Calling GetOrAddComponentSingleton will create a singleton. The parent gameobject of
this singleton will be created together with it in the scene. The location of the singleton will be:
"Singletons" GameObject -> "MyExampleMono1" GameObject -> MyExampleMono1
This way all created singletons will be created and grouped together in the
"Singletons" GameObject and accessible like any other MonoBehaviour as well.
Scriptable Object Injection & Singletons
Scriptable objects are ment as data containers created not at runtime but at editor time to store configuration data and use it in the editor UI or load it during runtime.
- The scriptable object consists of the class that extends
ScriptableObjectand the instance file that typically is created via the CreateAssetMenu annotation or via an editor script (see ScriptableObject.CreateInstance). - This allows to have many parallel instance files for a scriptable object that contain different configurations. These asset files can be loaded during runtime when placed in a Resources folder or can be linked directly in prefabs and Unity scenes in the Editor UI.
If scriptable object instances have to be dynamically loaded during runtime, the following example can help to avoid loading multiple different instances for the same ScriptableObject subclass into memory at once:
// Load a ScriptableObject instance and set it as the singleton:
var path = "MyExampleScriptableObject_Instance1.asset";
MyExampleScriptableObject x1 = ResourcesV2.LoadScriptableObjectInstance<MyExampleScriptableObject>(path);
IoC.inject.SetSingleton(x1);

// Now that the singleton is set this instance is always returned for the ScriptableObject class:
MyExampleScriptableObject x2 = IoC.inject.Get<MyExampleScriptableObject>(this);
Assert.AreSame(x1, x2);
The Link Pattern
Connecting prefabs created by designers with internal logic (e.g what should happen when the
user presses Button 1) often is beneficial to happen in a central place. To access all required
parts of the prefab the Link pattern and helper methods like gameObject.GetLinkMap() can be used:
// Load a prefab that contains Link MonoBehaviours:
GameObject prefab = ResourcesV2.LoadPrefab("ExamplePrefab1.prefab");

// Collect all Link MonoBehaviours in the prefab:
Dictionary<string, Link> links = prefab.GetLinkMap();

// In the Prefab Link-Monos are placed in all GameObjects that need
// to be accessed by the code. Links have a id to reference them:
// Via the Link.id the objects can quickly be accessed:
Assert.IsNotNull(links.Get<GameObject>("Button 1"));

// The GameObject "Button 1" contains a Button-Mono that can be accessed:
Button button1 = links.Get<Button>("Button 1");
button1.SetOnClickAction(delegate {
    Log.d("Button 1 clicked");
});

// The prefab also contains other Links in other places to quickly setup the UI:
links.Get<Text>("Text 1").text = "Some text";
links.Get<Toggle>("Toggle 1").SetOnValueChangedAction((isNowChecked) => {
    Log.d("Toggle 1 is now " + (isNowChecked ? "checked" : "unchecked"));
    return true;
});
The ViewStack Pattern
The ViewStack Pattern uses GameObjects as separate views stacked in a parent GameObject.
A ViewStack controller attached to this parent object controls switching between views.
Views can be hidden or shown through the ViewStack and new views can be loaded.
The main function of the ViewStack controller is to represent where the root of the ViewStack can
be found, which is especially relevant if multiple ViewStacks are stacked on top of each other.
A simple example for stacking multiple ViewStacks would be a main ViewStack that controls the
normal application flow and a second vie stack that is loaded together with one of the view prefabs that
represents a temporary tutorial or FUE that the user has to click through.
var viewStackGo = new GameObject();
var viewStack = viewStackGo.AddComponent<ViewStack>();

// Views can be added manually without using the ViewStack:
var view1 = viewStackGo.AddChild(new GameObject("View 1"));

// You can get the ViewStack using any child gameobject:
Assert.AreEqual(view1.GetViewStack(), viewStack);

// The latest active view can be accessed from the view stack:
Assert.AreEqual(view1, viewStack.GetLatestView());

// Views can also be added using the ViewStack.ShowView method:
var view2 = viewStack.ShowView(new GameObject("View 2"));

// Hide the old view 1 now that view 2 is on top:
view1.SetActiveV2(false);
Assert.IsFalse(view1.activeInHierarchy);
Assert.AreEqual(view2, viewStack.GetLatestView());

// The ViewStack can be used to return to the last view:
Assert.IsTrue(viewStack.SwitchBackToLastView(view2));

// View 2 will be removed from the view stack by destroying it:
Assert.IsTrue(view2.IsDestroyed());

// Now view 1 is active and visible again:
Assert.IsTrue(view1.activeInHierarchy);
MonoBehaviour.ExecuteDelayed & MonoBehaviour.ExecuteRepeated
// Execute a task after a defined time:
myMonoBehaviour.ExecuteDelayed(() => {
    Log.d("I am executed after 0.6 seconds");
}, delayInSecBeforeExecution: 0.6f);

// Execute a task multiple times:
myMonoBehaviour.ExecuteRepeated(() => {
    Log.d("I am executed every 0.3 seconds until I return false");
    return true;
}, delayInSecBetweenIterations: 0.3f, delayInSecBeforeFirstExecution: .2f);
Additionally there is myMono.StartCoroutinesInParallel(..) and myMono.StartCoroutinesSequetially(..), see here for details
UnityWebRequest.SendV2
- It is recommended to use the
Uriextension methods for requests (see here). - If
UnityWebRequesthas to be used, thenUnityWebRequest.SendV2()should be a good alternative. SendV2creates the sameRestRequestobjects that theUriextension methods create as well.
RestRequest request1 = UnityWebRequest.Get("https://httpbin.org/get").SendV2();
Task<HttpBinGetResp> requestTask = request1.GetResult<HttpBinGetResp>();
yield return requestTask.AsCoroutine();

HttpBinGetResp response = requestTask.Result;
Log.d("Your IP is " + response.origin);

// Alternatively the asynchronous callback in GetResult can be used:
UnityWebRequest.Get("https://httpbin.org/get").SendV2().GetResult<HttpBinGetResp>((result) => {
    Log.d("Your IP is " + response.origin);
});
PlayerPrefsV2
Since the Unity PlayerPrefs class uses static methods cscores normal approach with extension methods won’t work here,
thats why there is now PlayerPrefsV2 which extends PlayerPrefs and adds the following methods:
- PlayerPrefsV2.
SetBool& PlayerPrefsV2.GetBool - PlayerPrefsV2.
SetStringEncrypted& PlayerPrefsV2.GetStringDecrypted - PlayerPrefsV2.
SetObject& PlayerPrefsV2.GetObject
// PlayerPrefsV2.SetBool and PlayerPrefsV2.GetBool example:
bool myBool = true;
PlayerPrefsV2.SetBool("myBool", myBool);
Assert.AreEqual(myBool, PlayerPrefsV2.GetBool("myBool", defaultValue: false));

// PlayerPrefsV2.SetStringEncrypted and PlayerPrefsV2.GetStringDecrypted example:
PlayerPrefsV2.SetStringEncrypted("mySecureString", "some text to encrypt", password: "myPassword123");

var decryptedAgain = PlayerPrefsV2.GetStringDecrypted("mySecureString", null, password: "myPassword123");
Assert.AreEqual("some text to encrypt", decryptedAgain);

// PlayerPrefsV2.SetObject and PlayerPrefsV2.GetObject example (uses JSON internally):
MyClass1 myObjectToSave = new MyClass1() { myString = "Im a string", myInt = 123 };
PlayerPrefsV2.SetObject("myObject1", myObjectToSave);

MyClass1 objLoadedAgain = PlayerPrefsV2.GetObject<MyClass1>("myObject1", defaultValue: null);
Assert.AreEqual(myObjectToSave.myInt, objLoadedAgain.myInt);

    // MyClass1 would look e.g. like this:
    class MyClass1 {
        public string myString;
        public int myInt;
    }
Running xUnit tests in Unity
Initially I created this test runner to ensure that the xUnit tests I wrote for the pure C# components also were all working when running them on an actual build application, especially on platforms like WebGL this showed a few challanges with the async await Task syntax and some other edgecases. The basic idea was simple:
- Use the tests a small sample applications
- If the tests run correctly in a built application on the target platform the component can be correctly used on this platform
- A test runner is needed to run the tests. In addition the xUnit classes like the Assert class need to be implemented to be used in Unity
The outcome works pretty well and I managed to make all tests run correctly in WebGL which I used as a platform that has a lot of very limiting restrictions like no multithreading, strict sandboxing for file logic, persistance etc
-
You want your xUnit tests to stay in your pure C# project but you can link them into your Unity project to include them there as well
-
The xUnit runner needs a hint in which Assembly to search for your tests, for that it needs a fully qualified type name of any of the classes in the tests.
-
Select the XunitTestRunnerUi component in the XunitTestRunnerScene.unity to set this fully qualified type name (for example “
MyNamespace.MyClass1, MyAssembly1”). This name it will use to start searching for all xUnit tests in your Assembly.
Additionally in your nUnit tests you can also use the xUnitTestRunner, e.g. if you want writing all your unit tests with xUnit and use the nUnit tests only to trigger them. See the XunitTestRunnerTests.cs to understand how to use the xUnitTestRunner via code.
📦 Getting started
Select the type of project you want to install cscore to:
Install via NuGet
The NuGet package (for pure C#/.net projects) from nuget.org/packages/com.csutil.cscore can be installed in multiple ways, for example via the dotnet CLI:
dotnet add package com.csutil.cscore
Or you manually add the following lines to the your .csproj file:
<Project Sdk="Microsoft.NET.Sdk">
  ...
  <ItemGroup>
    <PackageReference Include="com.csutil.cscore" Version="*" />
  </ItemGroup>
  ...
</Project>
After adding the references, install the packages by executing dotnet restore inside the project folder.
Install cscore into your Unity project
The cscore project has some components that are only usable in Unity projects. There are different ways how to add cscore to your project, first the recommended way:
Using the Unity Package Manager (The recommended way)
- Open
Window -> Package Manager - Click on the
+Icon - Click “Add package from git URL…”
-
This way you can add the 5 separate cscore building blocks in the following order:
- Insert https://github.com/cs-util-com/cscore.git?path=CsCore/PlainNetClassLib/src/Plugins
- (Required) Contains the pure C# classes
- Insert https://github.com/cs-util-com/cscore.git?path=CsCore/CsCoreUnity/Plugins
- (Required) Contains the Unity related classes
- Insert https://github.com/cs-util-com/cscore.git?path=CsCore/UnityTests/Assets/Plugins/CsCoreUnityDemoScenes
- (Optional) Contains demo scenes that can be dragged into your
Assetsfolder to try them individually to learn about all features
- (Optional) Contains demo scenes that can be dragged into your
- Insert https://github.com/cs-util-com/cscore.git?path=CsCore/xUnitTests/src/Plugins
- (Optional) Contains the xUnit tests which test cscore. These can also be run in Unity using the included
XunitTestRunner.cs
- (Optional) Contains the xUnit tests which test cscore. These can also be run in Unity using the included
- Insert https://github.com/cs-util-com/cscore.git?path=CsCore/UnityTests/Assets/Plugins/CsCoreUnityTests
- (Optional) Contains the Unity tests of cscore to run with the Unity test runner
- Insert https://github.com/cs-util-com/cscore.git?path=CsCore/PlainNetClassLib/src/Plugins
The result will be that the manifest file which is located in your project at
YourUnityProject123/Packages/manifest.json has some new dependencies added.
Your can also manually open your manifest.json file with a text editor and add the lines by hand:
{
  "dependencies": {
    ...
	"com.csutil.cscore": "https://github.com/cs-util-com/cscore.git?path=CsCore/PlainNetClassLib/src/Plugins",
	"com.csutil.cscore.unity": "https://github.com/cs-util-com/cscore.git?path=CsCore/CsCoreUnity/Plugins",
	"com.csutil.cscore.tests": "https://github.com/cs-util-com/cscore.git?path=CsCore/xUnitTests/src/Plugins",
    "com.csutil.cscore.unity.demos": "https://github.com/cs-util-com/cscore.git?path=CsCore/UnityTests/Assets/Plugins/CsCoreUnityDemoScenes",
	"com.csutil.cscore.unity.tests": "https://github.com/cs-util-com/cscore.git?path=CsCore/UnityTests/Assets/Plugins/CsCoreUnityTests",
    ...
  }
}
More details how the Unity package manager works can be found here:
- https://docs.unity3d.com/Manual/upm-manifestPkg.html
- https://docs.unity3d.com/Packages/com.unity.package-manager-ui@2.0/manual/index.html
- https://docs.unity3d.com/Manual/upm-git.html
- https://docs.unity3d.com/Manual/CustomPackages.html
Alternative ways to add cscore to your Unity project:
- From the Asset Store (https://assetstore.unity.com/packages/tools/integration/cscore-138254)
- From the /CsCore/UnityPackages folder
- From the
masterbranch, you will have to link thesrcfolders to your Unity project, see e.g. the linking bat script in cscore\CsCore\PlainNetClassLib\src\linkThisIntoAUnityProject.bat. This option makes sense e.g. if you want to submit pull requests to- cscore. See also the section about Sym Links below.
Optional experimental Unity features
Some of the included features are disabled by default via the CSCORE_EXPERIMENTAL compile time define, to enable these features, go to
Player Settings -> Other Settings -> Scripting Define Symbols and add CSCORE_EXPERIMENTAL there. See the notes about
Scripting Define Symbols in the Unity Docs for more details how this works.
💚 Contributing
Pull requests are welcome. For major changes, please open an issue first to discuss what you would like to change.

Repository structure and instructions
The cscore project is separated into multiple folders:
- PlainNetClassLib - Contains the pure .net logic
- CsCoreUnity - Contains the Unity specific logic
- CsCoreNet3.5Compat - Contains classes for older Unity projects (that do not use
.net 4+yet) - xUnitTests - Contains the xunit tests that cover all functionality of the PlainNetClassLib folder
- UnityTests - Contains the Unity project with all NUnit tests that cover the Unity spefic CsCoreUnity features
- UnityPackages - Contains the ready to download Unity package that can alternatively be loaded via the AssetStore
Sym Links can be used to link the original PlainNetClassLib, CsCoreUnity and CsCoreNet3.5Compat folders into your target Unity project.
The sym link setup scripts (always named linkThisIntoAUnityProject) are located in the component folders (use the .bat on Win and .sh on Mac).
How to get in contact
 –
– ![]() –
– 
To stay updated via Email see https://www.csutil.com/updates
Core principles
- The main goal: Keep the API simple to use and provide an intuitive framework for common usecases. Stick to essential features only to keep the library lightweight
- Use examples as a kind of test driven development but with focus on usablility of the APIs (tests must focus more on validating correctness but examples can focus more on ease of use of the target API). Thats why each test class contains also a few methods that contain example usage
- Write as much of the logic in pure C# as reasonable, stay backwards compatible to .net 3.5 to support older Unity projects as well
- Use mutation testing to check for test coverage on a logic level
License
![]()